


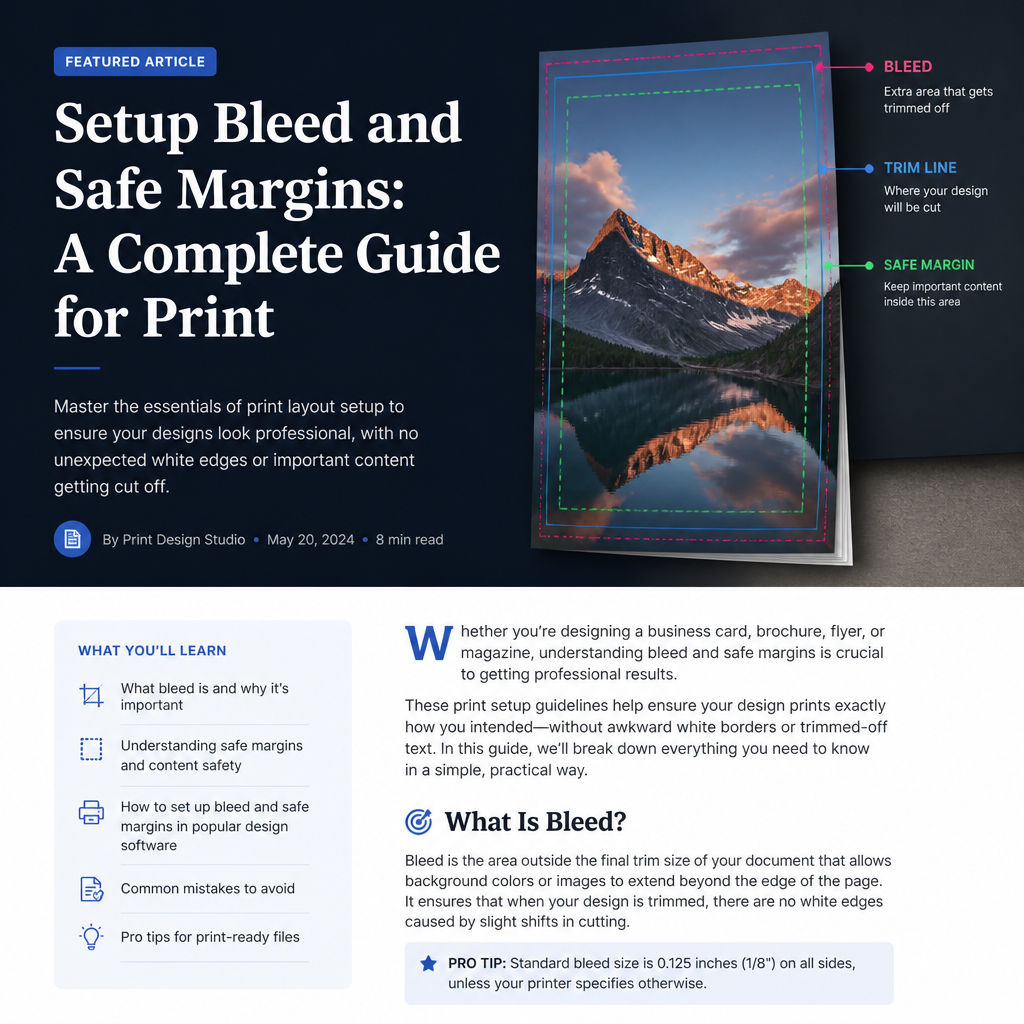
If you have ever sent a brilliant, perfectly centered sticker design to a professional printer, only to receive a final product where the edges of your artwork were mysteriously sliced off, you already know the pain of ignoring print boundaries. To guarantee a flawless print run every time, you must learn how to setup bleed and safe margins.
Understanding these two fundamental printing terms is the secret difference between amateur graphics and professional, retail-ready merchandise. Whether you are using Adobe Illustrator, Canva, or Photoshop, setting up the right boundaries ensures your art looks exactly how you intended once it runs through the cutting machine.
In this comprehensive guide, we will teach you exactly how to setup bleed and safe margins. Before finalizing your document sizes, be sure you have consulted our master guide on standard sticker sizes to ensure you are starting with the right canvas dimensions.
What is Full Bleed Printing?
In professional printing, the “bleed” refers to the extra artwork that intentionally extends beyond the actual trim edge of your sticker.
When large industrial machines cut through thick sheets of vinyl sticker paper, the blade can naturally shift by up to 1/16th or 1/8th of an inch. If your artwork stops exactly at the intended edge of the sticker, any slight shift in the blade will leave an ugly, unintended white border on one side of your design.
By extending your background color or pattern into the “bleed area,” you guarantee that even if the cutting blade shifts slightly, the edge of your sticker will still feature full, edge-to-edge color.
How to Setup Bleed
- Determine the Bleed Size: Most commercial printers require a standard bleed of 0.125 inches (1/8 inch) on all sides.
- Extend the Background: If you want a 2×2 inch square sticker, your canvas size should actually be 2.25 x 2.25 inches.
- Stretch the Art: Make sure your background colors, textures, or patterns stretch all the way to this outer 2.25-inch edge.
What are Safe Margins?
If the bleed is the outer safety net, the safe margin is the inner safety net.
The safe margin (or safe zone) is an invisible boundary located exactly 0.125 inches inside the intended cut line of your sticker. Because the cutting blade can shift inward just as easily as it can shift outward, you must keep all crucial elements of your design strictly inside this safe zone.
If you place important text, logos, or delicate character artwork outside the safe margin, you risk having it accidentally sliced off by the cutting machine.
How to Setup Safe Margins
- Draw an Inner Boundary: Draw a guideline 0.125 inches inside your final trim line.
- Move Crucial Elements: Select all text, branding, and important visual focus points and ensure they do not cross this inner boundary.
- Let the Background Flow: Only non-essential background colors and patterns should exist between the safe margin and the outer bleed line.
Software Setup Tips

Always check your design software settings for a dedicated bleed export option.
Whether you are designing kiss cut or die cut stickers, setting up these boundaries is simple in modern design software.
- In Adobe Illustrator: Go to File > Document Setup and enter “0.125 in” in the Bleed boxes. This will create a red box outside your artboard representing the bleed area.
- In Canva: Go to File > View Settings > Show Print Bleed. Canva will overlay a dashed line around the edge of your canvas to help you visualize the outer boundary.
- In Photoshop: Because Photoshop lacks a native bleed setting, you must manually add 0.25 inches to both your canvas width and height, and use the Ruler Tool to drag guides representing your trim and safe lines.
For deeper technical specifications on commercial pre-press setup, you can review the AIGA Design Print Guidelines.
Frequently Asked Questions
What happens if I don’t include a bleed area?
If you submit artwork without a bleed, the printer may automatically scale your artwork up to create one (which can crop out edges of your design), or they will print it as-is, resulting in uneven white borders around your final stickers due to natural cutter shift.
Do clear or transparent stickers need a bleed?
Yes! While the “bleed” on a transparent sticker is technically just clear vinyl, the printer still needs extra space around your artwork to ensure the cutting blade does not clip your opaque printed design.
Conclusion
Taking two extra minutes to properly setup bleed and safe margins is the most important step you can take before exporting your sticker files. By keeping text safely inside the margin and extending background colors out into the bleed, you guarantee that every single sticker arrives looking crisp, professional, and exactly how you envisioned.
